
In today’s fast-paced digital world, running out of storage space on your Android phone is more common than ever. From filming high resolution videos to managing thousands of photos, modern users need more flexible and powerful storage solutions. That’s where a magnetic portable SSD comes in—a cutting-edge tool that blends high speed data transfer, magnetic attachment, and solid state drive performance to support your Android devices wherever you go.
In this guide, we’ll walk you through exactly how to use a magnetic portable SSD with your Android smartphone, and how it can enhance your digital life.
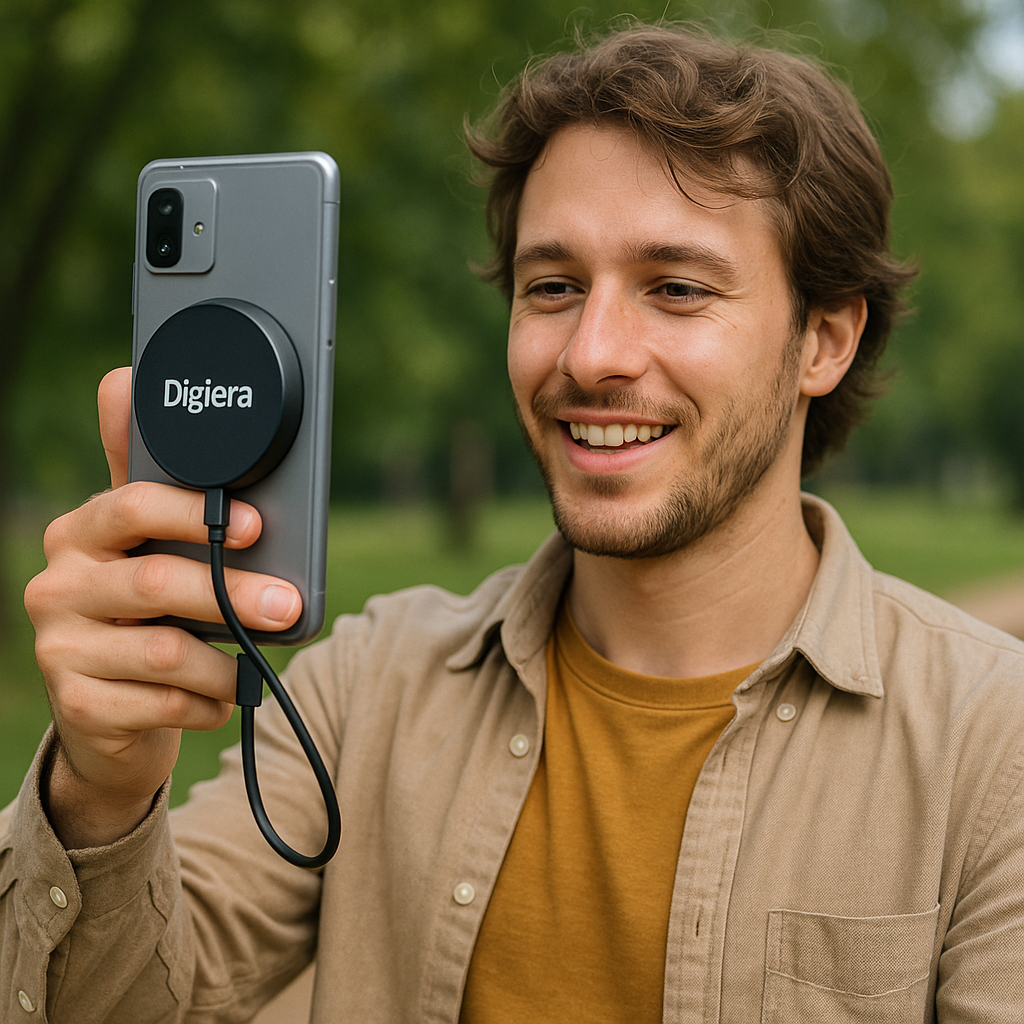
What Is a Magnetic Portable SSD?
A magnetic portable SSD is a solid state drive that combines ultra-fast performance with a magnetic attachment feature. These drives are designed to attach securely to the back of your smartphone, offering a seamless extension of your phone’s internal memory.
Unlike traditional hard drives or bulky storage solutions, portable SSDs are lightweight, shock-resistant, and offer incredible write speed and reliability—perfect for mobile phones, tablets, or even laptops.
For Android users, this means no more juggling SD cards or deleting old content to make room for new files.

Why Use a Portable SSD with Your Android Phone?
Let’s be honest: Android phones are powerful, but even the best ones eventually hit storage limits. Whether you’re a content creator, mobile gamer, or just someone who stores lots of videos, photos, and apps, the benefits of using a portable SSD are significant:
-
Fast file transfers with USB-C or USB 3.2 Gen 2
-
Magnetic mounting keeps the drive securely attached
-
Excellent write speed and read speed for real-time editing or backup
-
No more worrying about poor Wi-Fi services or cloud delays
These drives are ideal for Android devices such as Samsung Galaxy, Google Pixel, OnePlus, and other phones that support USB OTG (On-The-Go).
High Speed Data Transfer on Android Devices
When it comes to choosing a storage solution for your Android smartphone, high speed data transfer is the key feature that sets modern technology apart. A magnetic portable SSD, like those from Digiera, leverages advanced USB 3.2 Gen 2 or Gen 2x2 interfaces to move files quickly—up to 2000MB/s in read speed and 1800MB/s in write speed. This dramatically reduces the time it takes to back up your photos, export videos, or transfer large files from your device to your laptop or tablet.
In our review of portable SSDs for Android, we found that traditional SD cards and even cloud solutions couldn’t match the speed or reliability of a direct SSD connection. Whether you're recording high-resolution content, managing apps, or loading files for on-the-go presentations, high-speed transfer is essential.
And since stock can be limited during peak demand seasons (especially for creator-focused devices), it’s wise to subscribe to availability alerts or newsletters to stay updated. Brands like Digiera often restock popular models fast, but they can sell out quickly due to high performance demand.
How to Check Compatibility
Before you begin, ensure your Android smartphone supports USB OTG (most modern phones do). You’ll also want a portable SSD that offers:
-
USB-C connectivity
-
File system format compatible with Android (like exFAT)
-
Optional mobile app for file management
Tip: Most Digiera Magnetic Portable SSDs are plug-and-play with Android smartphones, supporting direct data access without the need for extra drivers or complicated settings.

Step-by-Step: How to Use a Magnetic Portable SSD with Android
1. Attach the Magnetic SSD
Start by physically attaching the SSD to your phone. Many SSD magnetically connect to Android phones with a magnetic ring plate or directly to MagSafe-compatible cases. This compact, non-intrusive design keeps your phone and SSD together—perfect for shooting content, transferring files, or traveling.
Ensure the magnetic contact is secure and doesn’t block your camera or buttons.
2. Connect the SSD to the Phone
Use the included USB-C to USB-C cable (or USB-C to USB-A if needed). Once connected:
-
A notification should pop up on your Android phone confirming the drive is detected.
-
You may need to tap “File Transfer” or “Mount Storage” depending on your device.
If you don’t see the prompt, go to:
Settings > Storage > External Storage > Mount (varies by device/brand)
3. Format the SSD (If Needed)
If the drive is not readable, it might be in an unsupported file system like NTFS or HFS+. Format it to exFAT, which supports both Windows and Android devices and allows storage of large files over 4GB.
To format:
-
On Android: Use a file manager app like Files by Google or FX File Explorer.
-
On PC: Connect the SSD and choose exFAT in the formatting options.
Note: Formatting will erase all existing data on the drive.
4. Manage Files Easily
Once mounted, you can use your favorite file manager app to browse, copy, move, or delete files. This is especially helpful for:
-
Backing up photos and videos
-
Editing content directly on the SSD
You can even record videos directly to the SSD in some camera apps, minimizing internal storage use while filming 4K video.
5. Safely Eject Before Disconnecting
To prevent file corruption:
-
Go to your device’s Settings > Storage
-
Select the external SSD
-
Tap “Eject” before physically unplugging
This ensures safe disconnection and extends the SSD’s lifespan.
Real-Life Examples
-
Content Creators use Digiera SSDs while filming vlogs to store hours of high resolution videos without lag.
-
Android gamers use it to load large game files faster and free up internal memory.
-
Travelers store thousands of photos from their trip without relying on cloud uploads.
No matter the task, the benefit is the same: speed, convenience, and security.
Conclusion
If you’re an Android user looking to enhance your smartphone’s performance, manage large files, and securely store critical content, a magnetic portable SSD is a game-changer.
From blazing high speed data transfer to seamless compatibility, these drives are built for today’s demanding digital lifestyle. Whether you’re a creator, gamer, or traveler, a magnetic SSD helps you stay focused, flexible, and future-ready—without the hassle of running out of space.
Ready to try it? Explore Digiera's Magnetic Portable SSD for Android and experience faster performance, peace of mind, and limitless storage—right from your smartphone.